Technical Support - Indoor Sport Services Utility & Log card
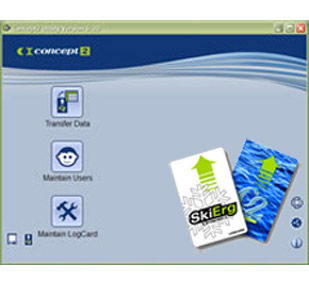
Click on each issue to expand
- Full User Guide
Overview
The Concept2 Utility allows you to update the firmware on your Performance Monitor (PM3 or PM4) and manage the data on your Log Card. With the utility, you can upload workouts to your Online Logbook at concept2.com or transfer workout data from your Log Card to a file on your PC or Mac. The Concept2 Utility also allows you to perform tasks such as deleting a user from your Log Card or clearing off workout data when your Log Card is full. Concept2 recommends running the most current version of the Concept2 Utility.
System Requirements
The basic system requirements are as follows:
- Internet connection (for uploading workouts, receiving version update notifications and updating firmware)
- PC or Mac running a compatible operating system
- Working USB connection to a PM or an external card reader
- Latest PM firmware recommended
More About Firmware
Firmware is the software that runs in your PM3 or PM4, and Concept2 recommends running the most current version available for your PM. If you need to update your firmware, use the Concept2 Utility to perform the update. The utility makes it easy! Some restrictions apply for PM3s with very old firmware:
- If you are a Mac user with a PM3, your PM3 must be running Firmware Version 97 or higher in order to use your Mac to update your PM3 firmware. If you are running a lower version of PM3 firmware, you will need to use a PC to update your PM3 firmware to the current version. Thereafter, you will be able to update your PM3 using your Mac and the Concept2 Utility.
- If you have a PM3 with Firmware Version 90 or below and plan to use your PM with the utility, (see Connecting Devices) you will be able to update your firmware using the utility, but other utility functions will be disabled until you update your firmware. These include:
- Erasing a user's workouts
- Deleting a user from a LogCard
- Moving a user to a different LogCard
- Copying a LogCard
- Erasing a LogCard
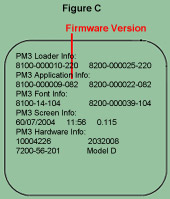
To determine which firmware version is running on your PM:
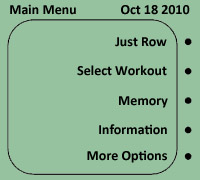
- Power up the PM and access the Main Menu. (An example of a PM3 Main Menu is shown below. If your PM is displaying a screen other than the Main Menu, press [Menu-Back] until the Main Menu is displayed).
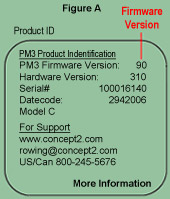
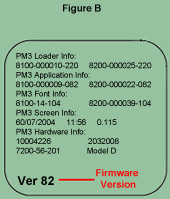
- Select More Options then Utilities, and then Product ID. Depending on your firmware version, the version number will be displayed as follows:
- Listed as "PM3 Firmware Version" or "PM4 Firmware Version" at the top of the Product ID window (see Figure A below)
- In large numbers at the bottom left of the Product ID window (see Figure B below)
- As the last three digits on the line following PM3 Application Info (see Figure C below)
Function Overview
You can perform the following tasks with the Concept2 Utility. (PM3 User see restrictions)
- Transfer Log Card data from a Log Card to a spreadsheet or to your online logbook at concept2.com:
- Erase a user's workouts
- Delete a user from the Log Card
- Move a user and their data to a different Log Card
- Create a backup file for the Log Card
- Transfer a backup file to a spreadsheet or an online logbook at concept2.com
- Restore Log Card data from a backup file
- Duplicate an entire Log Card
- Erase all Log Card data and users
- Repair damaged Log Cards
- Obtain notification that new versions of the Concept2 Utility are available for download
- Update the firmware in your PM to the most recent version
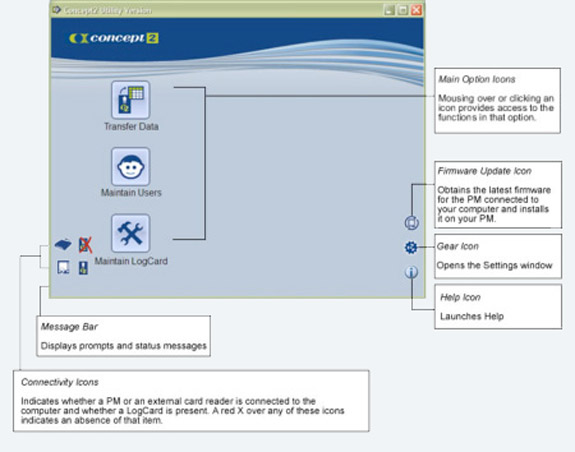
User Interface Overview
Connecting Devices
Before performing any functions with the Concept2 Utility, you will need to physically connect a device to your computer for the utility to communicate with/read your Log Card. For Log Card functions, this device can be a PM3, PM4 or an external card reader. For firmware updates, the device must be a PM3 or PM4.
Connecting the PM
Connecting a PM3 or PM4 to your computer requires two things:
- Getting your PM within reach of your computer - This can be accomplished by removing the PM from the indoor rower and taking it to your computer. Refer to your user manual for instructions.
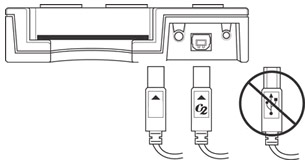
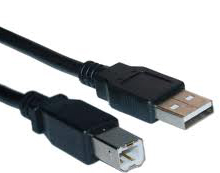
- A USB Cable - Every PM3/PM4 sold by Concept2 comes with a USB cable; however, this cable is not unique to Concept2. If you have lost your Concept2 supplied USB cable, any generic "Type B" USB cable will work (or USB printer cable). Just make sure you plug the USB cable into the PM correctly; otherwise, communication issues between the PM and the computer may occur. Refer to the following graphic:
- Windows Users: The first time you connect the PM, you may be prompted to install a driver for the "USB Device", which in this case, is the PM you just connected to your computer. Follow the prompts and accept the default selections. Some versions of Windows (such as Windows 98se) may require the Windows Operating System CD to install the driver.
- Mac Users with PM3s: See restrictions.
Notes:
If you have connected your PM to your computer, and there is a red X across the PM icon in the lower left corner of the main Concept2 Utility window, then the utility is not registering the connection. Take the following steps:
- Ensure the USB cable is correctly inserted in the PM.
- Ensure the PM is powered up. (Inserting the Log Card or the USB cable generally powers up the PM. You can also press any button on the PM to power it up.)
- Wait a few seconds to see if the red X goes away. If it doesn't, disconnect and then reconnect the PM.
- If steps 1-3 have not resolved the problem, reboot your computer, and repeat steps 1-3.
- If the problem persists, ensure your PM is running the latest version of PM firmware. If your PM is running the latest version of firmware and the connectivity problem persists, contact Concept2 for assistance.
Connecting an External Card Reader
It is possible to use an external card reader with the Concept2 Utility in place of a PM3 or PM4. Concept2 supports use of and sells the OmniKey CardMan 3121 and the Athena ASE IIIe card readers. These card readers have built-in USB cables, so connecting the card reader is just a matter of plugging it into a USB slot on your computer.
Additional Information for the Omnikey's Driver If you plan to use the OmniKey CardMan 3121 on a Windows computer with the Concept2 Utility, please refer to the OmniKey Card Reader Installation Guide. Concept2 recommends following this guide for ease of installation and use of your OmniKey Card Reader. The OmniKey CardMan 3121 is not compatible with Mac OS 10.5. For additional compatibility information, visit the Info for Card Reader Users section at Concept2 Utility.
Transferring Data
The Transfer Data option allows you to:
- Upload the data on your Log Card to your online logbook at concept2.com
- Transfer data from your Log Card to a spreadsheet
Following a transfer or upload, the information will remain on your Log Card until you delete the information, reformat the Log Card, or restore a backup file to the Log Card.
Uploading LogCard Data to an Online Logbook
At concept2.com, you can create a free online logbook for storing your meters and participating in online challenges. To save you from having to hand-key your workouts into your online logbook, you can use this option to upload your workout data from your Log Card directly to your online logbook. Using this option requires you to have a working internet connection and an online logbook at concept2.com.
- If you already have an online logbook, please have your online logbook username, password, and Ranking ID handy when using this option. To find your Ranking ID:
- Log into your online logbook at concept2.com.
- Click Profile near the top of the page. Your Ranking ID is listed in the Profile Settings section.
- If you do not already have an online logbook, take the following steps:
- In your web browser, go to concept2.com/logbook.
- Under New Users on the left side of the screen, click Register, and follow the prompts to create an online logbook.
To upload your workouts to your online logbook:
- Establish an internet connection.
- Connect your PM or external card reader to your computer and insert your Log Card into the device.
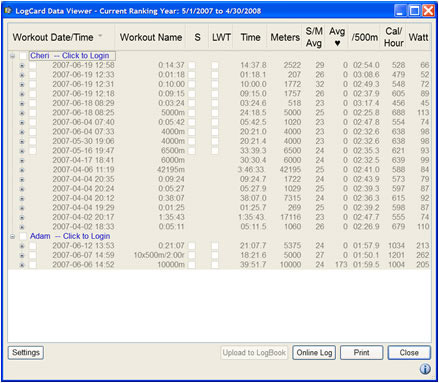
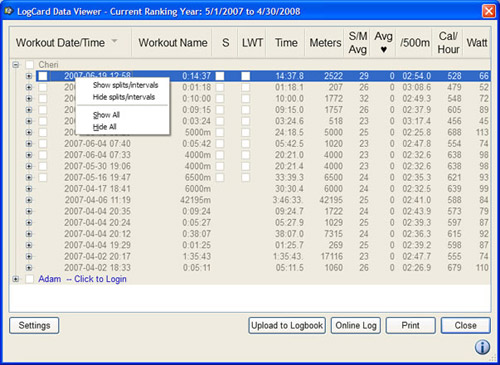
- On the main Concept2 Utility window, click Transfer Data > Upload to Online Logbook. The utility will read the Log Card, and display the workout data in a Log Card Data Viewer.
- In the Log Card Data Viewer window you should see a list of all the Log Card Users and their workouts from the Log Card. Find your name in the list and click Click to Login. If the information next to your name is an ID number followed by an email address, then you've validated (logged in) to the online logbook server in the past. Check the ID number displayed and make sure it matches your actual Ranking ID. If it does, skip to step 8. If it doesn't, proceed to the next step.
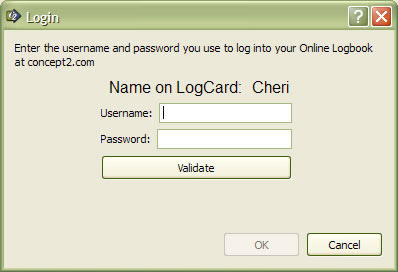
- In the Login window, enter the username and password you use to log into your online logbook at concept2.com.
- Click Validate. This identifies you to the online logbook database so that your workouts are uploaded to the correct online logbook. If you have entered your username and password correctly, the utility will retrieve and display your Ranking ID. Verify that the Ranking ID retrieved matches the Ranking ID from your online profile. If it doesn't, re-enter your username and password. If the resulting Ranking ID still does not match your actual Ranking ID, contact Concept2 for assistance.
- Click OK. The utility compares the workout data on your Log Card with the workouts you have already posted in your online logbook. It greys out any workouts that cannot be uploaded. This includes:
- Workouts done outside of the current ranking year. Each ranking year runs from May 1 to April 30. If the workout you want to upload is outside of the current ranking year, you will need to log into your online logbook at concept2.com and enter it as an historical workout (click History in your online logbook to enter the workout).
- Workouts done during the current ranking year that are already in your online logbook. The Concept2 Utility synchronises workouts on date, time, and distance. If the date, time, and distance of a workout in your online logbook matches that of a workout listed on your Log Card, that workout will not be available for upload.
- Select the workouts you would like to upload to your online logbook.
- Click Upload to Logbook.
- The Concept2 Utility uploads interval workouts as one workout where the distance equals the total distance (rest and work meters combined) and the time equals the total time (rest and work intervals combined).
- Occasionally, the Concept2 Utility's connection with the ranking server times out. If this occurs, the Concept2 Utility may display a message that you are not authorized, or that some other internet error has occurred. To remedy the issue, shut down the Concept2 Utility and restart it.
Printing the Contents of the Viewer Window
The Print button in the Log Card Data Viewer window generates a paper version of the information displayed in the viewer. For example, if you have expanded the splits for a particular Log Card user, the splits will be expanded for that user in the print out. If you have collapsed a user's workouts so that just the user's name is displayed in the viewer, then that is how the resulting print out will look. To quickly expand/collapse information for a user, right-click on that user's workouts to display the Show/Hide menu, and select a display option.
Saving Your Ranking ID and Other Viewer Settings
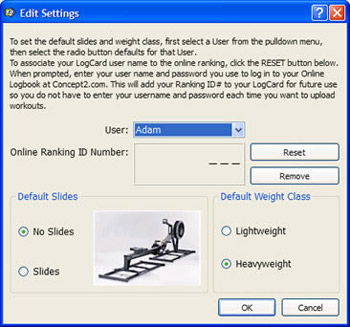
The Edit Settings window (accessed by clicking the Settings button in the Log Card Data Viewer window) allows you to set the following defaults:
- Ranking ID for your online logbook
- Whether the workout was performed on slides
- Your weight class
If you plan to use the Concept2 Utility frequently to upload your workouts to your online logbook at concept2.com, saving your Ranking ID to your Log Card saves you from having to enter your login information every time you want to upload workouts using this function. Your Ranking ID is automatically saved to your Log Card as part of transferring workouts to your online logbook. You can also use the Edit Settings window as described below:
- Establish an internet connection.
- Connect your PM or external card reader to your computer and insert your Log Card into the device.
- On the main Concept2 Utility window, click Transfer Data > Upload to Online Logbook. The utility will read the Log Card, and display the workout data in a Log Card Data Viewer.
- Click the Settings button.
- In the User field on the Edit Settings window, select the Log Card User whose Ranking ID you want to save.
- Click Reset.
- On the Login window, enter the username and password appropriate for that user's online logbook at concept2.com.
- Click Validate. If you have entered the username and password correctly, the utility will retrieve and display the user's Ranking ID. Verify that the Ranking ID retrieved matches the Ranking ID from the selected user's online logbook. If it doesn't, re-enter the username and password. If the resulting Ranking ID still does not match the actual Ranking ID, contact Concept2 for assistance.
- Click OK to close the Edit Settings window.
The next time you want to upload workouts to your online logbook, you will not need to log in to do so.
Removing Your Ranking ID from Your LogCard
In the future, if you no longer want your online logbook Ranking ID saved to your Log Card:
- Establish an internet connection.
- Connect your PM or external card reader to your computer and insert your Log Card into the device.
- On the main Concept2 Utility window, click Transfer Data > Upload to Online Logbook. The utility will read the Log Card, and display the workout data in a Log Card Data Viewer.
- Click the Settings button.
- In the User field on the Edit Settings window, select the Log Card User whose Ranking ID you want to remove.
- Click Remove.
- Click Yes to confirm the removal of your Ranking ID.
- Click OK to close the Edit Settings window.
Transferring LogCard Data to a Spreadsheet
When transferring data from your Log Card to a spreadsheet, the type of file the utility creates is a .csv file (for example, LogCard.csv). A .csv, or Comma Separated Value file, is a type of file in which the data is delineated, or separated, by commas. In other words, the commas tell a program where the different data elements begin and end.
Microsoft Excel, as well as other programs such as Microsoft Works or Access, can import and read .csv files. When opening a .csv file, you may be prompted by a Text Import Wizard to indicate how the data is delineated in the file. If this occurs, make the appropriate selections to indicate the data is delineated by commas.
To view the resulting file created with the Transfer to Spreadsheet option, you will need to have a program installed on your computer that is capable of opening .csv files. If you do not have a program on your computer with this capability, and you simply want to view the information on your LogCard, click Transfer Data > Upload to Online Logbook. The utility will read the Log Card and display the information in a Log Card Data Viewer.
The Transfer to Spreadsheet option transfers all the data on your Log Card (that is, you cannot transfer only certain pieces of information), and it will overwrite previously transferred data if you transfer data to the same file. Additionally, the Transfer to Spreadsheet option will not work if you are transferring to a file that you currently have open on your computer. In this case, close the file before doing the transfer, or change the name of the file the Concept2 Utility will create.
You cannot upload results to your online logbook from a .csv. Additionally, you cannot transfer data back onto a Log Card using a .csv; you must use a Log Card backup file (.lcb) for transferring data onto a LogCard. Take the following steps to transfer the data to a spreadsheet:
- Connect your PM or external card reader to your computer and insert your Log Card into the device.
- On the main Concept2 Utility window, click Transfer Data > Transfer to Spreadsheet. The Concept2 Utility displays the default location and name of the data file it will create.
- To change a file location, click Browse, and select a new location/file on your computer.
- To change the name of the file that will be created, type a new file name in the Spreadsheet file name box, but leave the ".csv" extension.
- If you want to view the results immediately following the transfer, select Automatically open file in Excel. (This appears as "Automatically open file in External Application" if Excel is not installed on your computer.)
- Click OK to transfer the data.
If you chose to have the utility automatically open the file and Excel is installed on your computer, the utility will launch Excel and display the spreadsheet created by the Transfer function. If Excel is not installed on your computer, the utility will prompt you to select the application you would like to use to display the spreadsheet created by the Transfer function. (If you have already set your computer to open .csv files in a particular application, the utility will use that application to open and display the file.) If some of the data is not visible or appears as ###### when viewing the data in a spreadsheet, the data is too wide for the column. Simply widen the spreadsheet column to see the data in its entirety.
Maintaining Users
Erasing Workouts
This option allows you to bulk-delete workouts for a specific user on the Log Card. You can delete all the workouts for a specific user, or only those workouts prior to a date you specify. Erasing workouts with the Concept2 Utility (vs with a PM3 or PM4) frees up space on the Log Card. Concept2 recommends creating a backup file of the Log Card before using this option.
- Connect your PM or external card reader to your computer and insert your Log Card into the device.
- On the main Concept2 Utility window, click Maintain Users > Erase Workouts, and follow any prompts displayed by the Concept2 Utility. The utility will read the Log Card and display a list of all the users on the Log Card.
- Select the user whose workouts you want to erase.
- Select a deletion method (all or prior to a specific date). If you chose the date-specific method, enter the date before which workouts will be deleted.
- Click OK. The Concept2 Utility will display the user whose workouts will be deleted along with the number of workouts that will be deleted.
- Click OK to confirm the deletion.
Deleting a User
This option completely removes a user, their workout data, lifetime meters, favorite workouts, and Ranking ID (if stored) from a Log Card. Deleting a user with the Concept2 Utility (vs with a PM3 or PM4) frees up space on the Log Card. Concept2 recommends creating a backup file of the LogCard before using this option.
- Connect your PM or external card reader to your computer and insert your Log Card into the device.
- On the main Concept2 Utility window, click Maintain Users > Delete User, and follow any prompts displayed by the Concept2 Utility. The utility will read the Log Card and display a list of all the users on the Log Card.
- Select the user you want to delete.
- Click OK, and confirm the deletion.
Moving a User to a Different Log Card
This option allows you to move a user off one Log Card and onto another; it is not a copy function. After using this option, the moved user, their workout data, lifetime meters, favourite workouts, and Ranking ID (if stored) will no longer reside on the original Log Card.
- Connect your PM or external card reader to your computer and insert your Log Card into the device.
- On the main Concept2 Utility window, click Maintain Users > Move User, and follow any prompts displayed by the Concept2 Utility. The utility will read the Log Card and display a list of all the users on the Log Card.
- Select the user you want to move.
- Click OK, and confirm the move. The Log Card will read the original Log Card, and prompt you when you need to insert the new Log Card into the device. The Concept2 Utility will then write the user to the new Log Card.
Maintaining a Log Card
Creating a Backup File
It is a good idea to back up your Log Card data periodically. The Create Backup File option allows you to do this very quickly. The file type this option creates is an .lcb file, which stands for Log Card Backup.
Note: The Concept2 Utility automatically creates an .lcb file if it encountered and fixed an error on the Log Card while performing any of the Concept2 Utility functions. For more information about these backup files, refer to Repairing Damaged Log Cards.
- Connect your PM or external card reader to your computer and insert your Log Card into the device.
- On the main Concept2 Utility window, click Maintain Log Card > Create Backup File.
- The Concept2 Utility displays the default location and name of the data file it will create:
- To change a file location, click Browse, and select a new location on your computer.
- To change the name of the backup file that will be created, type a new file name in the file name box, but leave the ".lcb" extension.
- Click OK.
Transferring a Backup File
Once you have created a backup file, you can transfer it to a spreadsheet or to your online logbook.
- Click Maintain Log Card > Transfer Backup File.
- The Concept2 Utility displays the default location and name of the backup file it will transfer data from. To select a different file, click Browse and navigate to the .lcb file you want to transfer. Note: The file selected must be an .lcb file to perform this function.
- Click OK.
- Choose the destination for the transferred data: Spreadsheet or Online Logbook, and follow the appropriate steps below:
Transfer to Spreadsheet
- The Concept2 Utility displays the default location and name of the .csv file it will create after transferring the data.
- To change a file location, click Browse, and select a new location/file on your computer.
- To change the name of the file that will be created, type a new file name in the Spreadsheet file name box, but leave the ".csv" extension.
- If you want to view the results immediately following the transfer, select Automatically open file in Excel (this appears as "Open file in External Application" if Excel is not installed on your computer).
- Click OK to transfer the data.
- The Concept2 Utility displays the default location and name of the .csv file it will create after transferring the data.
- Click OK The utility reads the backup file data and displays it in the Log Card Data Viewer.
- Establish an internet connection.
- If you do not yet have an online logbook at concept2.com, visit concept2.com/logbook, click Register and follow the prompts to create one before continuing.
- If you have not previously saved your Ranking ID in the Log Card Data Viewer Settings panel, click Click to Login next to your name in the Log Card Data Viewer window.
- In the Login window, enter the username and password you use to log into your online logbook at concept2.com.
- Click Validate. If you have entered your username and password correctly, the utility will retrieve and display your Ranking ID. Verify that the Ranking ID retrieved matches the Ranking ID from your online profile. If it doesn't, re-enter your username and password. If the resulting Ranking ID still does not match your actual Ranking ID, contact Concept2 for assistance.
- Click OK. The utility compares the workout data on your Log Card with the workouts you have already posted in your online logbook. It greys out any workouts that cannot be uploaded. This includes:
- Workouts done outside of the current ranking year. Each ranking year runs from May 1 to April 30. If the workout you want to upload is outside of the current ranking year, you will need to log into your online logbook at concept2.com and enter it as an historical workout (click History in your online logbook to enter the workout).
- Workouts done during the current ranking year that are already in your online logbook. The Concept2 Utility synchronises workouts on date, time, and distance. If the date, time, and distance of a workout in your online logbook matches that of a workout listed on your Log Card, that workout will not be available for upload.
- Select the workouts you would like to upload to your online logbook.
- Click Upload to Logbook.
- The Concept2 Utility uploads interval workouts as one workout where the distance equals the total distance (rest and work meters combined) and the time equals the total time (rest and work intervals combined).
- Occasionally, the Concept2 Utility's connection with the ranking server times out. If this occurs, the Concept2 Utility may display a message that you are not authorized, or that some other internet error has occurred. To remedy the issue, shut down the Concept2 Utility and restart it.
Transfer to Online Logbook
Notes:
Restoring a LogCard from a Backup File
Use this option to restore data on your Log Card from a backup file. This function completely overwrites the Log Card with data from a backup file you select. To use this option, you will need an .lcb file (a Log Card backup file). Connect your PM or external card reader to your computer and insert your Log Card into the device.
- On the main Concept2 Utility window, click Maintain Log Card > Restore Log Card from Backup File.
- The Concept2 Utility displays the default location and name of the backup file it will use to restore information to your Log Card. To select a different backup file for the utility to use, click Browse, and select a new file.
- Click OK.
Duplicating a LogCard
Use this option to create a copy of a Log Card.
- Connect your PM or external card reader to your computer.
- Click Maintain Log Card > Duplicate Log Card.
- Insert the Log Card you want to duplicate into the PM or external card reader, and click OK.
- Change Log Cards when the utility prompts you to insert the new Log Card into the PM or external card reader.
- Click OK.
- The utility will write the new Log Card. You can then either make another copy of the Log Card, or remove the duplicate Log Card and begin using it.
Erasing a Log Card
Use this option to remove all the data stored on a Log Card. Concept2 recommends creating a backup file of the Log Card before using this option.
- Connect your PM or external card reader to your computer.
- Click Maintain Log Card > Erase Log Card.
- Insert the Log Card you want to erase into the PM or external card reader.
- Click OK, and confirm that you want to completely erase the Log Card. The lower left corner of the Concept2 Utility indicates that the Log Card is being erased. (If you are using a PM, the PM screen will also indicate that the Log Card is being erased.)
Repairing Damaged Log Cards
Occasionally, a Log Card may become corrupted. Examples of when this may occur include:
- Using a Log Card with an older PM3 (this may result is a 39-4 error)
- Using third-party software that accesses information on the Log Card
- Removing a Log Card from the PM while the PM is writing information to the Log Card
Anytime the Concept2 Utility reads a Log Card, it will try to determine whether there is an error on the Log Card. It will attempt to automatically repair the Log Card if an error is encountered. If the Concept2 Utility is attempting to repair a multi-user Log Card, it may require some assistance from you in identifying which workouts belong to which user. If this occurs, the utility will display a group of workouts and ask you to identify the user to which the workouts belong. (You will be given an opportunity to preview the fixes before writing the corrected data to the Log Card.) If you cannot determine the correct user, click the I cannot determine the user button to stop the repair process. You can attempt the repair process again at a later date when you have determined which workouts belong to which user.
Whenever the Concept2 Utility encounters an error on a Log Card, it automatically creates a backup file of the Log Card. This file is saved as an .lcb file, which stands for Log Card Backup. Each .lcb file that is automatically created due to an error on the Log Card includes a date/time stamp in the file name for your reference (for example, PM3LogCard 2005-10-07 170354.lcb). (The last set of numbers is the time stamp (hhmmss) in military format.) You can use the date/time stamp to differentiate these backup files from backup files you create with the Create Backup File option, as files created with the Create Backup File option do not automatically include the date/time stamp in the filename.
Following a Log Card repair, the utility may ask if you'd like to send your data to Concept2 for analysis. Any data sent to Concept2 is used to understand what problems are occurring and what solutions to implement to improve the product. If you choose to send data, you will also have the opportunity to include comments and your email address. Inclusion of this information does not guarantee that Concept2 will contact you. (If you are trying to get help with your Log Card, follow the instructions under (Getting Help when Your LogCard cannot be Repaired.) Concept2 does not disclose this information to anyone other than Concept2 engineering staff and contracted software developers.
Getting Help when Your LogCard cannot be Repaired
In some cases, the Concept2 Utility may not be able to repair a Log Card. If this occurs, you will need some assistance from Concept2. To help us help you, please create a .ZIP archive of any backup files automatically created by the Concept2 Utility, and email that .ZIP archive to rowing@concept2.com. While Concept2 cannot guarantee that we will be able to repair your Log Card, we will do our very best to assist you.
Updating Firmware on Demand
Depending on what you've selected under Settings/Preferences for firmware updates, the Concept2 Utility may notify you that new firmware is available for your PM and prompt you to update it. If this occurs, Concept2 recommends updating the PM. Just follow the Concept2 Utility prompts.
Regardless of your preference settings, you can get the latest firmware at any time for the PM connected to your computer as follows:
- Establish an internet connection.
- Connect your PM to your computer.
- On the main Concept2 Utility window, click install firmware (the top icon on the right). The utility downloads from the Concept2 website the appropriate firmware file for the PM connected to your computer.
- Follow the Concept2 Utility prompts to update your PM.
Settings/Preferences
The Concept2 Utility is configured to periodically check Concept2's web site for updates to the Concept2 Utility and the PM firmware (firmware is the software that runs in your Performance Monitor). If you have an active internet connection running when you launch the Concept2 Utility, by default the utility will check to see if any updates are available and prompt you accordingly. You can then download the new version of the utility or simply close the prompt.
Additionally, if you plug a PM into your computer, have the Concept2 Utility running, and have an active internet connection, the utility will check to see if a newer version of PM firmware is available for download. If updates are available and you would like to install them, simply follow the prompts to do so. The Settings/Preferences window in the Concept2 Utility allows you to:
- Change the frequency with which the Concept2 Utility checks for updates
- Enable/Disable automatic checking
- Enable/Disable automatic reminders to update your PM
- Manually check for updates
- Manually update your PM firmware
- Indicate whether you are interested in trying Beta (Test) Firmware-Beta Firmware is the prototype for a new firmware version before its official release. Beta Firmware may include new features and fixes for issues discovered in current versions.
To access and edit these settings, on the bottom right of the main Concept2 Utility window, click the change program options (middle icon on the right)
Note: Updating firmware on older PM3s or using older computers can occasionally be problematic. Concept2 has made the process as easy and robust as possible. Although it is a rare occurrence, it is possible to render your PM3 inoperable if the update process does not fully complete. In most cases, you can complete the update process by rebooting your computer and trying the update again, or trying the update on a different computer.
Concept2 is available for email or telephone support if you encounter problems. Please email technicalhelp@concept2.co.uk or call 0115 945 5522
- Utility Overview
Formerly known as the LogCard Utility, the Concept2 Utility is software that allows you to manage the workout data on your Concept2 Log Card (Log Cards are the smart cards that work with PM3 and PM4 monitors). With the Concept2 Utility you can backup your workout data, chart your progress, or analyse your historical performance. You can even upload your workout data to your Online Logbook at concept2.com
Using the Concept2 Utility is easy: Once you've installed and are running the Concept2 Utility on your computer, simply plug your PM3 or PM4 into your computer using a USB cable, insert your Log Card into your PM3/PM4 and away you go! Using this method, the PM3/PM4 acts as a card reader and allows you to use the Concept2 Utility to work with the data on your Log Card.
If your computer is not located near your indoor rower, simply unplug the PM3/PM4 from the indoor rower, remove it from the monitor arm, and take it to your computer. When you are done using it as a card reader, return it to the indoor rower for your next workout. If you prefer not moving your PM, you can purchase a card reader for your computer. The Concept2 Utility is both PC and Mac compatible.
Concept2 Utility Functions
You can perform the following functions with the Concept2 Utility:
- Transfer LogCard Data from the Log Card to a spreadsheet or to your online logbook at concept2.com
- Erase a user's workouts *
- Delete a user from the Log Card *
- Move a user and their data to a different Log Card *
- Create a backup file for the Log Card
- Transfer a backup file to a spreadsheet or to your online logbook at concept2.com
- Restore Log Card data from a backup file
- Duplicate an entire Log Card *
- Erase all Log Card data and users *
- Repair damaged Log Cards
- Obtain notification that new versions of the Concept2 Utility are available for download
- Update the firmware in your PM to the most recent version
Note: If you are using a PM3 in conjunction with the Concept2 Utility to read your Log Card, all functions above that are marked with an asterisk will be disabled unless your PM3 is running Firmware Version 90 or above.
How to Get
The Concept2 Utility is free. Go to concept2.co.uk/software to access the file and for step-by-step instructions on installing your Concept2 Utility software.
- How to use the Concept2 Utility (Quick Guide)
Instructions on how to use the Concept2 Utility are available by clicking the help button (bottom icon in the lower right corner of the Concept2 Utility main window).
Tips & Tricks
- Polar Users: Polar WebSync (software used to transfer data from Polar products to the www.polarpersonaltrainer.com web service) prevents the Concept2 Utility from communicating with the PM3 or PM4. If WebSync is running before the Concept2 Utility is launched, the Concept2 Utility will continue displaying a red X over the PM icon until WebSync is closed. Close WebSync, and the Concept2 Utility will immediately begin communicating with the PM3 or PM4.
- In order for the Concept2 Utility to function, the Performance Monitor must be in a non-rowing mode, displaying the Main Menu or other menu screen. If the PM is in a rowing mode, that is, displaying information for a workout in-progress, the Concept2 Utility will not function.
- You must have a live internet connection in order to upload workout information to your online logbook at concept2.com.
- Each user who has an online logbook at concept2.com is assigned a unique Ranking ID. If you are using the Concept2 Utility to transfer workout information to your online logbook at concept2.com and there are multiple users on your Log Card, you must ensure that each user on the Log Card is set to their unique Ranking ID. If you have multiple users set to the same Ranking ID, one or more of the following problems may occur:
- Error 161 on the Log Card
- Inability to upload workouts to the online ranking system
- Loss of Ranking ID on one or more of your users on the Log Card
- Loss of Lifetime meters on the Log Card
- To ensure each user is set to their unique Ranking ID:
- Connect your PM3/PM4/card reader to your computer.
- Start the Concept2 Utility.
- Under Transfer Data, click Upload to Online Logbook.
- When the Log Card Data Viewer window is displayed, click the Settings button.
- On the Edit Settings window, use the User drop down box to look through the users on your Log Card. Each user should have a unique Ranking ID displayed in the Online Ranking ID Number box. If the number is not unique, click the Remove button. The numbers change to dashes ("---") to indicate that the Ranking ID is not set for the selected user. To set the Ranking ID:
- Click Reset.
- In the Username and Password boxes, enter the username and password the selected user would enter to log into their online logbook at concept2.com.
- Click Validate. The Concept2 Utility will check the username and password entered against the online logbook database at concept2.com. If it finds a match, it will return a Ranking ID number. If it does not find a match, please ensure that you have entered the username and password correctly.
- Information for Card Reader Users
Card readers make it easy to work with Log Card data. With a card reader, you don't need to have your computer within a cable's length of your PM or remove your PM from your indoor rower and take it to your computer in order to read your Log Card. Simply plug the card reader into your computer, and insert the Log Card into it. You can then use Concept2's free Concept2 Utility program to transfer your workout data to your computer or to your online logbook at concept2.com.
Concept2 stock both the Athena ASEDrive IIIe card reader, and the OmniKey CardMan 3121, as both readers can be used. Other card reader brands and models have been reported to work with the Concept2 Utility but are not guaranteed to do so. Regardless of which card reader you plan to use, before purchasing, ensure that it will be compatible with your operating system (see below).
Log Cards are not included with card reader purchases.
Compatibility
Before purchasing a card reader, please review the device compatibility information below to ensure the card reader you purchase will work with the computer and operating system you have.
Device Windows Macintosh Omnikey CardMan 3121 Yes, must use Omnikey's Driver - 10.7: No
- 10.6: Yes, download driver
- 10.5: Yes, download driver
- 10.4.2 - 10.4.11 Yes
- 10.3.9: Yes
- Intel Macs: Yes
- All Others: Untested
Athena ASE IIIe Yes - 10.7: Yes
- 10.6: Yes
- 10.5: Yes
- 10.4.2 - 10.4.11 Yes
- 10.4.1: No
- 10.4.0: No
- 10.3: Yes
- Intel Macs: Yes
Note: Concept2 has had reports from some customers that the OmniKey 4000 and OmniKey 4040 card readers work with the Windows version of the Concept2 Utility. Please note that this information is provided here for your reference and that Concept2 does not directly support these devices.
Instructions for Card Reader Users
Refer to the following guides to get started with your card reader:
About Drivers
To use a card reader with the Concept2 Utility, your computer needs to have the correct drivers in order to communicate with the card reader. The best way to get the correct drivers is to establish an internet connection and then plug your card reader into your computer. With the card reader plugged in: Macintosh systems typically acquire and install the correct driver for you behind the scenes. Windows systems typically launch a wizard that walks you through getting the correct driver. If your computer is having trouble recognising your card reader even with the correct drivers installed, try rebooting your computer, particularly if you use a Mac.
- Installing the Concept2 Utility
To Download and Run this Setup Now
- Click Save or Run at right. The File Download window is displayed.
- On the File Download window, click Open. The InstallShield Wizard launches and guides you through the installation and setup.
Saving the Setup to Your Hard Drive for Later Installation
- Click Save or Run at right. The File Download window is displayed.
- On the File Download window, click Save.
- On the Save As window, navigate to the folder in which you would like to save the file and click Save.
- When you are ready to install the setup program, locate the file on your hard drive (same location as where you saved the file in step 3).
- Double-click the file to begin installation. The InstallShield Wizard will launch and guide you through the setup.
Notes:
- If you need assistance with the InstallShield Wizard, click here
- Mac users may need to reboot following installation before attempting to use the Concept2 Utility.
- PM Firmware System Requirements
The minimum system requirements for using this software are as follows:
- PC or Mac running one of the following:
- Windows 7
- Windows Vista
- Windows XP
- Windows Pro XP Home
- Windows XP Media Center
- Windows 2000
- Windows ME
- Windows 98se
- Mac OS X 10.6
- Mac OS X 10.5
- Mac OS X 10.4.2
- Mac OS X 10.3
- Working USB connection to the PM
- PC or Mac running one of the following:
- PM Firmware Troubleshooting
If you have attempted the update more than once and are encountering problems, ie. USB time out, then you can force the monitor into 'loader mode', please take the following steps to complete the procedure for a PM4:
- Simultaneously press and hold the [Change Units] button, as well as the 1st and 5th grey menu buttons on the right.
- While holding these buttons, either pinhole reset the monitor using a paper clip pushed into the reset pinhole on the back (located either above the bottom right case screw hole or bottom left case screw hole) of the monitor or remove and replace one of the monitor batteries.
- Release the buttons when you see "Concept2 Flash Loader" on the PM4 screen.
- If the issue is not resolved, close and restart the Concept2 Utility. If the issue persists, try rebooting your computer and attempting the update again.
If you have performed the reset and are still encountering problems with the update, please note the PM4 screen contents (error messages, etc.) and contact Concept2 for assistance. Note for MacBook Users: If you have attempted the update multiple times without success, try another USB port. Some MacBook users have reported that this resolved the issue. If the problem persists, contact Concept2 for assistance.
Additional Resources
- For additional firmware update troubleshooting, see Updating Your Firmware.
- For general PM4 monitor troubleshooting, see PM4 Monitor Technical Support.
Encountering Errors
If an error is encountered after programming is complete, you can recover the PM4 by trying one or more of the following:
- Remove all other USB devices (printers, scanners, hubs, and so on) while updating your PM4.
- Try connecting your PM4 to a different USB port. Concept2 recommends use of a USB port on your computer and does not recommend using a hub.
- Try the update on another computer.
If you encounter a problem, we would like to hear from you. Please email technicalhelp@concept2.co.uk or contact Concept2 at 0115 945 5522.
- Updating Your Firmware
Obtain the current version of the Concept2 Utility, then follow one of the procedures below based on your scenario:
Updating a Single or a Few Monitors
This procedure is best suited to situations where you have only a handful of monitors to update and you are able to access the internet during the update. If you need to update several monitors, monitors of differing models, or monitors in a location without an internet connection (for example, a boathouse) See Updating Many Monitors below:
- Connect to the internet.
- Shut down any other PM4 applications (RowPro, for example) you have running.
- Connect your PM4 to your computer with the USB cable that came with your PM4. Windows machines may prompt you for information regarding the connection. If that happens, disconnect any other USB devices and ensure that you plug the USB cable in correctly.
- Launch the Concept2 Utility on your computer.
- Do one of the following, based on your scenario and needs:
Install the Latest General Release
- To quickly install the current general release firmware on the PM connected to your computer, click the Install Firmware button (top icon on the right side of the main window) of the Concept2 Utility and follow the prompts. When the installation is complete, you can disconnect the PM and begin using it.
Install Beta Firmware
- On the main window of the Concept2 Utility, click change Program Options (middle icon on the right side of the main window)
- Click Firmware Types.
- Select "I am interested in having the latest "Beta Test" firmware" and click OK.
- On the Settings window, click Firmware Updates.
- Select Automatically download firmware updates for the PM that is attached to this computer.
- Click Check Now. The Concept2 Utility will display a list of the current firmware versions.
- Select the firmware version you need, and then click Download Now. The selected firmware version is downloaded to your computer.
- When the Concept2 Utility prompts you to install the firmware on your PM, follow the installation wizard.
Updating Many Monitors
The following procedure is helpful when you have several performance monitors to update or if you have to update performance monitors that are in a location without an internet connection. You'll just need an internet connection for the first step of acquiring the various firmware versions; thereafter, you'll be able to update the performance monitors directly from a computer (a laptop is ideal) without needing to connect to the internet. Here is the step-by-step:
- Connect to the internet, and on your computer, launch the Concept2 Utility.
- On the main window of the Concept2 Utility, click change Program Options (middle icon on the right side of the main window)
- On the Settings window, click Firmware Updates.
- Under "Please choose an update download method:" select Automatically download firmware updates for all PM monitors and models and click Check Now.
- On the Firmware Updates Available window, select Download ALL files and click Download Now. Your computer will now have firmware updates for all PM3 and PM4 models.
- Disconnect from the internet (optional).
- When it's time to update the performance monitors, take your computer with the firmware files to the performance monitor location and launch the Concept2 Utility.
- Shut down any other PM applications (RowPro, for example) you have running.
- Plug a performance monitor into your computer. The Concept2 Utility will prompt you to update the firmware for the performance monitor plugged into the computer. Simply follow the prompts. No internet connection needed!
- Continue the process for each performance monitor you have to update.
- All My Ski Workouts Upload as Rows
You use the Concept2 Ski Ergometer and upload your SkiErg workouts to your online logbook; however, all your SkiErg pieces are marked as indoor rower pieces in your online logbook.
To rectify this, upgrade to Concept2 Utility Version 6.30 or higher. Future SkiErg workouts will be correctly uploaded as type "skierg."
To correct previously uploaded workouts, you can either edit the Type value for those workouts in your online logbook. Or, if you still have the workouts on your Log Card, you can delete those workouts from your online logbook, and re-upload them after you have upgraded to Concept2 Utility Version 6.30 or higher.
- Cannot Validate Username/Password
You are attempting to validate to concept2.com for uploading workouts to your online logbook, but you keep receiving an "Invalid Username or Password" message:
- Make sure you have previously established an online logbook at www.concept2.com/sranking03/log.asp before attempting to use the Concept2 Utility to upload workouts.
- Make sure you are entering your username and password exactly as you would at www.concept2.com/sranking03/log.asp to access your online logbook.
- Make sure you are running the most current version of the Concept2 Utility. If you are using Version 6.00, there is a known issue whereby the Concept2 Utility may lose connectivity with the online logbook if you have been running the Concept2 Utility for several minutes. Updating the Concept2 Utility may resolve the problem with logging in.
- In the Concept2 Utility Login window, make sure you are entering a password. By default, the Concept2 Utility displays a series of black dots in the Password field; this does not mean that the Concept2 Utility has stored your password. Overwrite the black dots and enter your full password, and then click Validate.
- Firmware Update Problems
You were trying to update the firmware in your PM, and your PM is now stuck on "Concept2 USB Flash Loader" or "Concept2 USB Flash Loader Update" and isn't doing anything else or you were trying to update the firmware on your monitor and now the monitor is dead (that is, the monitor screen is completely blank).
- Upgrade to Concept2 Utility 6.41 or higher and try the firmware update again. If the problem persists after upgrading, take the following steps:
- Without unplugging your PM from your computer, close the Concept2 Utility and reboot your computer.
- Restart your computer and relaunch the Concept2 Utility.
- When the "Do you want to program the application?" message appears, click Yes and let the utility finish the update.
- If the above does not work, please contact technicalhelp@concept2.co.uk for assistance.
- Upgrade to Concept2 Utility 6.41 or higher and try the firmware update again. If the problem persists after upgrading, take the following steps:
- From the PM, remove the USB Cable and the battery pack (PM4 only) or top D cell battery.
- On the monitor face, simultaneously press and hold [Change Units], and the top and bottom buttons (first and last grey button the right), while re-inserting the battery pack (PM4 only)/D cell battery. "Concept2 USB Flash Loader" should now appear on the PM display.
- Plug in the USB cable and try the update again.
- If the above does not work, please contact technicalhelp@concept2.co.uk for assistance.
- Upgrade to Concept2 Utility 6.41 or higher and try the firmware update again. If the problem persists after upgrading, take the following steps:
- Logbook Server Error/Can't Connect to Concept2.com
You are attempting to validate to concept2.com for uploading workouts to your online logbook, you cannot connect and are receiving a "Logbook Server Error."
- Make sure you are connected to the internet before running the Concept2 Utility.
- If you have a working internet connection, but the problem persists, your computer's firewall may be interfering. Try turning your firewall or anti-spyware programs off, and then running the Concept2 Utility to see if it works. If it does, then the firewall or anti-spyware program is the cause of the problem. Consult with the firewall software vendor for assistance in unblocking the Concept2 Utility. The Concept2 Utility uses both HTTP and FTP services.
- The Concept2 Utility Wants to Rewrite the Card
The Concept2 Utility is attempting to read the Log Card in order to either upload workouts to your online logbook or transfer workouts to a spreadsheet, and the Concept2 Utility is displaying a message that it needs to rewrite the card.
Allow the Concept2 Utility to rewrite the card; you will not lose any data. When the Concept2 Utility asks to rewrite a Log Card, it is doing so because one of the following conditions has occurred, and rewriting the Log Card repairs the problems:
- Workouts are out of date order on the card.
- Data is damaged on the Log Card and needs repair.
During a Log Card rewrite/repair, you may be prompted to answer some questions (for example, if there is more than one user on a Log Card, the utility may ask which user a particular workout belongs to). This is not unusual; the Concept2 Utility simply needs additional information to fix the data properly. Don't be afraid! Trust the utility to do the job properly.
- Red X Appears Over Log Card Icon
You are using a PM3 or PM4 to read your LogCard, the PM is properly connected to your computer, but the red X over the Log Card icon on the Concept2 Utility main window will not go away or you are using a card reader to read your Log Card, the card reader is connected to your computer via the USB cable, but the red X over the card reader icon on the Concept2 Utility main window will not go away.
- Make sure the Log Card is inserted completely and in the proper orientation in the PM. The blue side of the card should be facing you, and the arrow should be pointing into the monitor. When properly inserted, the arrow is no longer visible.
- (For OmniKey Card Readers Only) Ensure that the OmniKey driver is installed properly. See Installing the OmniKey Card Reader for more information.
- (For Athena Card Readers Only) Update the driver for the Athena Card Reader:
- Connect your card reader to your computer.
- Connect to the internet.
- On your computer, access the Device Manager: right-click Computer, click Manage, and then click Device Manager.
- In the list of devices, double-click SmartCard Readers.
- Follow the instructions for updating the driver from the internet.
- Red X Appears Over PM Icon
The PM is connected to your computer via the USB cable, but the red X over the PM icon on the Concept2 Utility main window will not go away.
The Concept2 Utility cannot "see" the PM. Take the following steps:
- Shut down any other PM software (like Rowpro or Polar WebSync) that you have running. Note: Polar WebSync, in particular, prevents the PM from communicating with the Concept2 Utility. Additionally, Dell Stage and Fingertapps software (which is included on some Dell Touch screens) have also prevented communication between the PM and the Concept2 Utility.
- Unplug the PM.
- Reboot your computer.
- After reboot, run only the Concept2 Utility.
- Turn on your computer's volume.
- Plug the PM back into the computer, taking care to plug the USB cable in correctly. Your computer should make a ding-ding sound whenever the PM is plugged in or unplugged. If you did not hear this sound and the red X persists:
- Try plugging the USB into a different port on your computer.
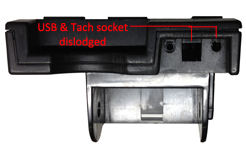
- If the problem persists, try using a different USB cable. (Any "Type B" USB cable (pictured) will work; 5m versions are available from Concept2.) If the new cable works, the old cable is faulty.
- If using a different cable does not resolve the issue, remove the USB cable and the battery pack (PM4 only) or batteries from the monitor, and leave them out for 30 minutes. Then, reinstall the batteries/battery pack, and the USB cable, and try again.
- If still no success, the USB port on your computer may be broken. You can test this by trying another computer. Otherwise, contact Concept2 for additional support, or return the unit for repair.
- Workouts are Greyed Out
The workouts you want to upload are greyed out in the Log Card Data Viewer window and cannot be selected for upload.
- Make sure you have validated/logged into the Concept2 server. You can determine whether you are logged into the Concept2 server by finding your name in the Log Card Data Viewer window; if the words "Click to Login" appear next to your name, you have not logged into the server. Click Click to Login and enter the username and password you normally use to log into your online logbook at concept2.com.
- If your Log Card has more than one user, make sure each user is set to their unique ranking ID.
Each individual who has an online logbook at concept2.com is assigned a unique ranking ID. The Concept2 Utility uses this ranking ID to identify the correct profile to which to upload results. If the same ranking ID is being used for more than one Log Card user, the Concept2 Utility cannot properly synchronise workouts and will grey out all workouts for all the users sharing that ranking ID. Remove the ranking ID from all users except the user to whom that ranking ID really belongs. Do this as follows:
- On the Log Card Data Viewer window, click Settings. The Edit Settings window is displayed.
- In the User field, select a user from which you need to remove the ranking ID.
- Click Remove.
- Click Yes to confirm the removal of the ranking ID.
- Repeat steps 2-4 until the ranking ID is in use for only one user, and for the user to whom it really belongs.
- Multiple Log Card users being set to the same ranking ID typically occurs when the same username and password was used to validate/log multiple users into the Concept2 server. To set your Log Card user to the correct ranking ID:
- On the Log Card Data Viewer window, click Settings. The Edit Settings window is displayed.
- In the User field, select your Log Card user.
- Click Reset.
- On the Login window, enter the same username and password you use to log into your online logbook at concept2.com. Make sure you overwrite the black dots in the Password field with your actual password.
- Click Validate. The Concept2 Utility will send this information to the Concept2 server. If the information is correct, it will display your ranking ID on the Edit Settings window.
- If the ranking ID is correct, click OK. If the ranking ID is not correct, try validating again. If you don't know your ranking ID, log into your online profile at concept2.com and click Profile. Your ranking ID appears below your date of birth.
- If you have successfully validated/logged into the Concept2 server, and the workouts are still greyed out, that means the workouts are ineligible for upload. This occurs when any of the following are true:
- The workout is from a different ranking year. Each ranking year runs from May 1-April 30. Only workouts that fall in the current ranking year can be uploaded.
- The Concept2 Utility found a matching workout in your online logbook. Once you validate to the Concept2 server, the Concept2 Utility checks to see what workouts already exist in your logbook. Workouts are matched between the Log Card and the online logbook by:
- Workout date
- Workout time (applies only to Concept2 Utility Version 6.22 and above)
- Workout duration in time
- Workout duration in meters
- The workout has a future date. (This usually occurs when the date on the PM is incorrect.)

